Welcome to the "Project Planner" help document for the Roads Slider. This guide will provide an overview of the Project Planner tab, including its features, functionalities, and how to efficiently use it to manage your road preservation projects.
Overview of the Project Planner Tab
Navigating to the Project Planner Tab
- Open the Roads Slider interface on your screen.
- Locate the Road icon in the left-hand corner.
- Click the Road icon to display the map on the right side of the screen.
- Observe the Roads Slider on the left side of the screen.
- Identify the four tabs at the bottom of the Roads Slider.
- Find the second tab labeled "Project Planner."
- Click on the "Project Planner" tab to load the tool.

Network PCI Scores Graph 
At the top of the Project Planner tab, you'll find your Network PCI Scores Graph, which serves as a crucial tool for understanding the state of your road infrastructure. This graph provides a detailed visual representation of the overall condition of your road network by assigning each road segment a Pavement Condition Index (PCI) score. The PCI scores are categorized into different buckets, each representing a range of conditions from excellent to poor. By analyzing the percentage of roads that fall within each scoring bucket, you can quickly assess which areas of your road network are in good health and which require immediate attention or maintenance. This comprehensive overview enables you to prioritize your preservation efforts and allocate resources more effectively, ensuring that your road network remains in optimal condition.
Current Network Status
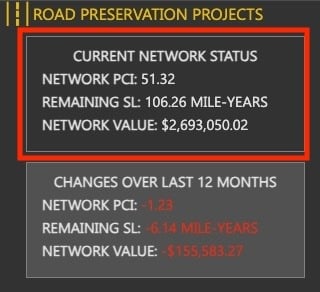 To the left of the PCI Scores Graph, the Current Network Status section offers a comprehensive snapshot of the overall state of your road network, providing essential insights at a glance. This section displays crucial metrics such as the average PCI scores, which indicate the general condition and performance of the roads within your network. Additionally, you will find data on the remaining Service Life of the roads, allowing you to gauge how much longer the roads can be expected to function effectively before requiring significant maintenance or replacement. Furthermore, the total Network Value is presented, reflecting the financial worth of the entire road infrastructure. By reviewing this information, you can gain a clear understanding of the current health and sustainability of your network, enabling you to make informed decisions and develop strategic plans to maintain and improve the road system effectively. This section serves as a vital management tool, guiding you in prioritizing maintenance tasks and efficiently allocating resources to ensure optimal road network performance.
Changes Over Last 12 Months
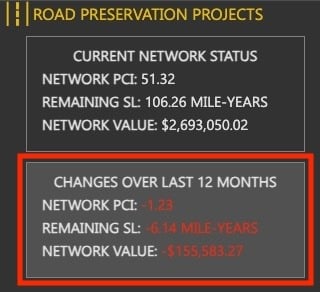 Beneath the Current Network Status section, you will find the Changes Over Last 12 Months display. This feature provides an in-depth and comprehensive view of the variations and trends in your network's key performance indicators over the past year. Within this display, you can observe the alterations in your Network PCI, which tracks how the pavement condition has evolved, highlighting any improvements or deteriorations. Additionally, it shows changes in the Remaining Service Life of the roads, offering insights into how maintenance activities or external factors have impacted the longevity of your infrastructure. Furthermore, it details shifts in the Network Value, reflecting financial adjustments that may have resulted from enhancement projects, depreciation, or other fiscal influences. By examining these dynamic changes, you gain a clearer understanding of the historical performance and current status of your road network, which aids in forecasting future needs and planning strategic maintenance activities more effectively.
Road Preservation Types Table
Below the Network PCI Scores Graph and Current Network Status, you'll find the Road Preservation Types Table. This table provides detailed information about different types of preservation treatments available. It includes four key columns:
- Type: The type of preservation treatment (e.g., Overlay, Crack Sealing).
- Candidates (Total Number): The total number of roads within your network that are candidates for the selected preservation types.
- Length: The total length of all candidate roads for the preservation type measured in feet.
- Estimated Cost: The estimated cost for applying the identified preservation treatment to all candidate roads.

At the bottom of the table, you'll see cumulative totals for both the Length and Estimated Cost for all roads in your network. This gives you an overview of the potential scope and financial implications of performing each preservation type across all candidate roads.
Visualizing Candidates for each Treatment Type
On the left side of the Road Preservation Types Table, you’ll find check boxes next to each preservation type. By selecting a check box, the application will filter and display all roads that are candidates for that particular treatment type. This feature allows you to quickly identify and focus on roads that would benefit from specific preservation measures.

Adding road Candidates to a Project
Once you have clicked the Treatment Type you are interested in, the application will load and suggest all Candidate roads for that treatment type. To add these candidate roads to a project:
- Select or Deselect Roads:
- Review the list of suggested candidate roads.
- Check or uncheck the roads you wish to include in the project.
- Click "Add Candidates to a Project":
- After finalizing your road selections, click the "Add Candidates to a Project" button.
- *NOTE*: To add a Candidate to a Project, the Project must already exist. Click here to learn more about creating Projects.**
- Project Selection Modal:
- A window will open displaying a table of projects in your account. This table includes the following columns:
- Project Name: The name of the project.
- Status: The status of each project (e.g., active, completed).
- Cost/Budget: The allocated budget for the project.
- Number of Efforts: The number of preservation efforts currently associated with the project.
- A window will open displaying a table of projects in your account. This table includes the following columns:
- Choose Your Project:
- Click on the project you wish to add the selected roads to.
- Confirmation Options:
- Use Another Project: Redirects you to review other projects if you decide to choose a different project.
- Confirm Add to Project: Finalizes the addition of the selected roads to the chosen project.

Conclusion
The Project Planner tab in the Roads Slider provides essential tools for managing road preservation projects. You can effectively plan and prioritize preservation efforts within this interface. Adding Candidate roads to a Project is straightforward and ensures that your preservation strategies are well-organized and actionable.
For any additional questions or support, please contact customer support at support@roadmantech.com.